
Estimated reading time: 7 minutes
What’s up everyone? Subterranean here. Today, we’ll dive deep into creating that chunky, squelchy bass sound you often hear in hybrid trap and dubstep songs. Think artists like Snails and others pushing the genre. Let’s get started!
Table of contents
- Step 1: Initializing the Preset in Serum
- Creating the Custom Wavetable
- Fine-Tuning LFO 1
- Adding Oscillator 2
- Applying Filter and Modulation
- Adding Effects Inside Serum
- External Effects
- Creating a MIDI Clip
- Pitch Bend Modulation
- Adding More External Effects
- Finishing Touch
- SERUM COURSE: Sound Design In Serum With Dan Larsson
- FAQs
Step 1: Initializing the Preset in Serum
Alright, first things first. Fire up Serum and initialize the preset. We’re gonna strip down to basics, so let’s remove any external effects for now. We’ll add those later. Let’s dive into our first oscillator.
Creating the Custom Wavetable
We’ll begin by using a custom wavetable. This wavetable was crafted by importing a bass I previously made back into Serum. In case you’re unsure of how to install it, check out the download link in the description box, which includes detailed instructions. You can also grab the full Ableton project file there. Here’s what we have to start:

I prefer the default wavetable position. Let’s grab LFO 1 and drag it to the wavetable position and see the outcome.
Fine-Tuning LFO 1
I find setting it to 64 works best. Now, let’s take the rate of our LFO 1, decrease it to 1 bar, and set it to trigger mode.
Next, we’ll adjust the curve of LFO 1 to look something like this:

Now, let’s apply a bend plus/minus from the warp mode and tweak it until the sound is just right.
Adding Oscillator 2
Turn down the master volume to prevent clipping during heavy effects processing. Activate oscillator 2 and select the “squelchy 1” wavetable from the spectrum category. Play around to find a suitable position:

Setting it around 93 works well. Let’s bring our LFO 1 back and apply it to this oscillator’s wavetable position. We’ll leave it on the default of about 64.
Enable the bend plus/minus warp and adjust it to 8, with modulation set around 27.
Applying Filter and Modulation
Activate the filter and set it to HP12 under the multi category. Again, apply LFO 1 to the filter’s cut-off. Adjust until you find a satisfying sound at about 44 Hz, and fine-tune the modulation.
Set the resonance to 42 for a sharper edge.
Adding Effects Inside Serum
Hyper/Dimension
First up, the hyper dimension effect. Decrease the mix to 25. For dimension size, set it to 11, with a mix of around 45.
Distortion
Now, let’s play with distortion. Using “Diode-2” mode, adjust the drive until it hits a sweet spot. I find 37 usually works well.
Flanger & Phaser
Time for some flanger. Decrease the rate to ensure it’s modulated by the LFO instead of random BPM. Set the depth to 51% and modulate by 23.
For the phaser, turn off the rate and reduce the depth. Apply LFO 1 to control the frequency. Tweak to around 232 Hz and modulate it by 47.
EQ & Compressor
Add an EQ, select a peak, and increase the gain to approximately 9.4 dB, modulating the frequency to about 113 Hz.
Lastly, apply a multiband compressor. Set the gain to roughly 13.6 dB and move the threshold to -16.7 dB for a balanced sound.
External Effects
Pitch Bend
Before diving into external effects, adjust the pitch bend. Set it to 8 semitones up and -13 semitones down. This will create a more pronounced pitch modulation effect.
Vocoder
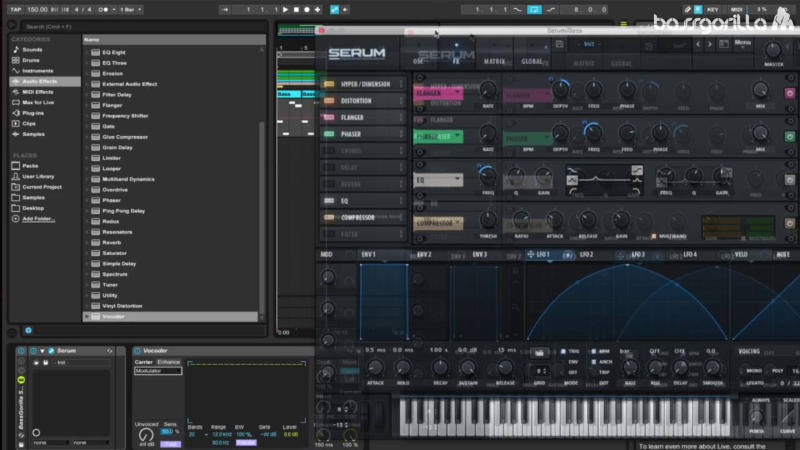
Add a vocoder set to modulator mode with 40 bands. Set the release around 29.5 milliseconds. Adjust the format if necessary, but for this sound, it’s usually best left as is.
External Phaser
Apply an external phaser. Modulate it similarly to how you did in Serum. Set the frequency around 400-500 Hz, poles to 8, color to 0, and test the dry/wet until it sounds good (66% works well). Increase feedback to 0.85.
Creating a MIDI Clip
Delete any pre-existing MIDI clips and create a new one with random notes:

Mute the drums to isolate the bass. Without modulation, it sounds plain. Now, modulate the phaser’s frequency with creative curves to add more depth and character.
Pitch Bend Modulation
Randomly modulate the pitch bend for even more variation:

This demonstrates the potential, although these settings are random.
Adding More External Effects
Multiband Dynamics
Add a multiband dynamics effect and select the OTT preset. Fine-tune:
- High output: 10.6 dB
- Mid: leave as is
- Low: 16.3 dB
Adjust the overall output to suit the mix, around 8.10.
Reverb
Reverb on a bass? It works in this context. Use a low cut on the reverb, emphasize high frequencies, and set decay to around 1.22 seconds. Adjust dry/wet to about 21% and disable chorus.
Final EQ Adjustments
Apply an EQ Eight to clean up the sound.
- Band 1: 4x low cut (~137 Hz)
- Band 3: Frequency -15 dB (1.291 Q)
- Band 4: Frequency 2.74 kHz, gain -14.8 dB (Q 6.02)
- Band 6: Frequency 14.5 kHz, gain +10 dB (Q 0.26)
- Band 7: Frequency 197 Hz, gain -15 dB (Q 2.59)
- Band 8: Frequency 449 Hz, gain -15 dB (Q 4.62)
Finishing Touch
Lastly, add the Clip Shifter plugin—a free third-party plugin. The default settings will be sufficient, enhancing the bass’s overall punch and compression.
With that, our bass is complete. This detailed tutorial ensures that you have a powerful sound ready to drop in any hybrid trap or dubstep track.
“Don’t be afraid to experiment with modulation. The more creative you get, the more unique your sound will become.”
I hope you enjoyed this tutorial. Please like the video, leave a comment, and subscribe to our channel on Youtube if you haven’t already!
Happy producing!
SERUM COURSE: Sound Design In Serum With Dan Larsson
Find out how to make mind-melting basses, leads, pads and more with Serum – the most powerful wavetable synth on the entire planet!
Related Posts
FAQs
To initialize a preset in Serum, open the plugin and select the option to initialize the preset. This will reset all settings to default, removing any existing effects or modifications. Start with a clean slate for creating your Snails bass sound.
Begin with a custom wavetable crafted from a previously created bass sound. Import this wavetable into Serum and use it as the foundation for your bass. Adjust the wavetable position with LFO 1 for the desired sound texture.
Set LFO 1 to a rate of 1 bar and choose trigger mode. Adjust the curve to fit your desired effect, typically setting the LFO amount to around 64. This controls the wavetable position and filter cut-off for dynamic modulation.
Apply Hyper/Dimension with a mix of 25 and size of 11, Distortion with “Diode-2” mode, Flanger with depth at 51%, and Phaser with frequency around 232 Hz. These effects add width, distortion, and movement to the bass sound.
For external effects, set the pitch bend to +8 and -13 semitones. Use a vocoder with 40 bands and a release of 29.5 ms. Add an external phaser with frequency around 400-500 Hz and a feedback of 0.85 for extra depth and character.