
Estimated reading time: 11 minutes
Getting Started
What’s up, everyone? Subterranean here. And today we’re gonna learn how to make this base.
Note: The content of the relevant paragraphs does not provide further detail or additional content beyond the initial greeting and topic introduction. If additional paragraphs were provided, more content would be included in this section according to the guidelines.
Table of contents
Creating Robotic Dubstep Bass in Serum
This is a very robotic and metallic, almost digital sounding dubstep bass with a very distinct character to it. Sounds like this haven’t had a lot of use in electronic music until very recently, with artists like too vain using the sound very prominently. I really enjoy these types of sounds, and I thought it’d be great to do a tutorial on how to make ones that are similar.
So, we’ll start by initializing the preset in Serum. And like always, we’ll delete these external effects as we won’t be using those until much later.
Analog Oscillator Setup
Now let’s go to our first oscillator, and we’ll be changing this to Basic Shapes, which is under the Analog category. Set the wavetable position to seven—all the way to the right. Now, fire up Oscillator B and use the exact same settings for this Basic Shapes. We’ll be modulating this base using FM. So, take the volume of the first oscillator and drag it down by clicking on the level knob and dragging it all the way down.
And now it’s muted. Remember, when you’re making FM modulated sounds in Serum, do not turn off the oscillator, but rather just turn off the volume. If you turn off the oscillator altogether, then the sound won’t work. Now, go to the second oscillator and turn the octave up all the way to +4.

Additional Keywords for SEO
- Analog Oscillator
- Basic Shapes
- FM Modulation
- Serum Wavetable
Tweaking FM Knob and LFO Modulation
We’ll go to our warp menu and select FM from A. And now let’s move the FM knob up and see if we get a good sound.
You can hear the grit coming through just a little bit when we move it to 20%. So we’ll leave it there. Now we’ll take our LFO 1, drag it onto the FM, and now we’ll tweak with the modulation and see what we get.
Fine-Tuning Your Filter Settings
We’ll leave it on 64. You can already hear that robotic, growly sound coming through with just a little bit of modulation, but it’s still pretty dry. So we’re going to fire up a filter. We’ll change it to be an HP twelve under the multi category, and we’ll run oscillators A and B through it. Now let’s tweak with the cutoff knob and see what we get.
41 Hz.
Now let’s take our LFO 1 and drag it onto the cutoff. And we’ll tweak with the modulation. Once again, 42 should be good. Let’s decrease the volume of the master because we’re going to be adding a lot of effects later on and we don’t want any clipping. About 44% will work.
Now we’ll take the resonance of our filter and increase it to about 47. And before we move on to the effects, let’s change how this LFO 1 works. We’ll go to our mode and switch it to trigger. And let’s make a different kind of curve for this because the default one isn’t really doing it for me. Let’s take this little knob and move it up and then do the same thing for the other knob.
Fine-Tuning LFO Settings
And we’ll decrease the rate to one two. And now we have this much better. Now we’ll take our lfo two. We’ll make kind of a similar curve, maybe a little more narrow. Set that to trigger, increase the rate to one eight.
And then we’ll turn the volume down on oscillator B and then add lfo two to the level. And now we have this sound.
Tweaking the Mix
We’re getting there, but it’s still pretty dry. So let’s go to our effects. We’ll add on a hyper dimension and let’s tweak with the mix and see what we get. Not too much, maybe about 24%. We’ll leave the rest the same.
We’ll increase the mix of the dimension to somewhere around maybe 13. And that will play with the size.
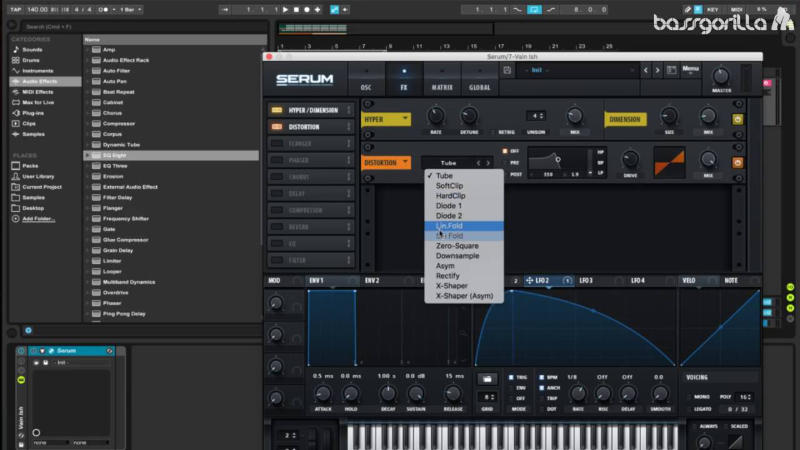
About 15% will be good. Now we’ll fire up a distortion. We’ll set this to be a downsample. And this is where a lot of that unique digital sound starts to come through. Let’s tweak with the drive and see what we get.

21% should be good. I suggest that when you download the project file or the preset for this sound that you tweak with the drive yourself and see if you get some more interesting and unique sounds because there’s a lot to work with. But I like it on 21%. So we’ll leave it on there. And now we’ll tweak with the mix.
About 67% works well. And now we’ll turn on a phaser like usual. We’ll turn the rate and depth all the way down. And now we’ll play with the frequency knob and see if we can find a sweet spot.
Somewhere around 661 Hz should work. Now we’ll take our LFO two, drag it down to the frequency and now let’s decrease the modulation.
About 29 will work. And that will set the mix to about halfway at 51%. Now we’ll turn on a compressor. We’ll switch it over to a multiband compressor. And now we’re going to turn up the gain.
Audio Effects Adjustments
Let’s dive into some specific audio effect adjustments, starting with the vocoder and then moving onto the phaser settings.
Vocoder Settings

First, we’ll set the carrier to be a modulator. This involves:
- Increasing the number of bands to 40 from 20
- Setting the range to 20
Next, we’ll tweak the release and format settings:
- Adjust the release to around 42 milliseconds
- Decrease the format to -2 to eliminate excess high frequencies and avoid a tinny sound
You can optionally modulate the format similar to our previous grousl sounds, but it’s not essential here.
Phaser Settings

For the phaser, follow these steps:
- Set the number of poles to 3
- Adjust the color to about 28.9
Now, experiment with the frequency to get a good sound at approximately 1.76 kHz. Increase the feedback to 80, and adjust the dry/wet setting to 28.9.
Usually, I’d modulate the frequency manually, but in this case, we’ll use the LFO inside the phaser. Do the following:
- Set the phase and dec to 0 to avoid unwanted stereo effects
- Adjust the rate to about 114
- Play with the amount to get the desired sound
Enhancing Your Mix with Free Plugins
Camel Crusher
About 38.9 works well. Just a subtle phaser. Now we’re going to go for some third-party effects, which, as always, are free. We’re going to be using Camel Crusher for our first third-party effect. If you’ve seen some of my earlier videos, you should already have this installed.
We’re going to set this to be the tube warmth preset, turn off the filter, decrease the tube a little bit, and turn up the mech just a little bit. This adds some really nice grip to the sound. Camel Crusher is a really good distortion plugin.
Multi-band Dynamics
Now we’re going to fire up multi-band dynamics. We’ll actually be using the Super GR growl preset that I made in one of my earlier tutorials. If you haven’t seen that video, this preset will also be included in the Ableton project file along with the serum preset.
Reverb
And now we’re going to add on a reverb. As always, we’ll turn on low cut and leave high cut on and make a curve. Something like this. This time maybe have a little bit more emphasis on the highs as this is a sound which has a lot of high frequencies in it. Turn off the chorus.
Now we’re going to play with the decay time and see if we get a good sound. Maybe about 1.76 seconds, or 1.8 maybe. Now we do the same thing for the dry wet, about 10%. A nice subtle reverb.
EQ Eight
Now we’ll add on an EQ Eight and get rid of a lot of those muddy and resonant frequencies.
- First EQ Band: Our first EQ curve is going to be a low cut. Not the four x, just a regular low cut. We’ll set this to be 150. Let’s play with the quantize and see if we get a sound we like. Doesn’t need too much tweaking. Maybe about 1.02.
- Second EQ Band: Now we’ll take our second band. We’ll set this to be 612 Hz. Let’s play with the gain. I think it’d be good to cut out those frequencies with a -15 decibel gain. And once again we’ll play with the quantize, about 3.32.
- Fourth EQ Band: Our fourth EQ band, we’ll set this to be the default. We’ll put this at 820. We’ll decrease the gain all the way. Again. And let’s tweak with the quantize settings again. Probably go with something pretty tight, about 6.98. That’s better.
- Fifth EQ Band: Now we’ll take band five. We’ll set this to be about 1.12. Once again we’ll decrease the gain all the way. And we’ll tweak with quantize once again about 2.94.
- Sixth EQ Band: Now we’ll turn on band six. Set this to be a pretty high frequency, like about 11.8. Let’s decrease the gain just a little bit to -0.62 because there are a few too many high frequencies going on. And we want to decrease that just a little bit and we’ll leave the quantize where it is at 0.71.
- Seventh EQ Band: For our last EQ band we’ll turn on band seven. We’ll set that to be 259. Once again, we’ll decrease the gain all the way at -15 and now let’s tighten up the quantize about 6.42.
Clip Shifter
We only have one more third-party plugin we’re going to add and if you’ve been watching my other tutorials you might know what this is already. We’ll be adding Clip Shifter. All we’re going to do in clip shifter is we’re going to increase the in gain to about 6.49 to give the sound a little bit more raw grit. And there we have our sound.
Keywords: Camel Crusher, Multi-band Dynamics, Reverb, EQ Eight, Clip Shifter

Wrap-Up
So that was my tutorial. I hope you enjoyed it. Please like this video and leave a comment as it really helps us out. And please subscribe to our channel if you haven’t already.

Thank you for your support!
Related Posts
FAQs
This tutorial focuses on creating a robotic, digital dubstep bass sound using Serum. The sound is metallic, gritty, and distinct, recently gaining popularity in electronic music. It is modulated using FM and other effects to achieve a growling, robotic character.
In Serum, set Oscillator A and B to “Basic Shapes” under the Analog category, with the wavetable position set to seven. Turn down Oscillator A’s volume but leave it active. Then, raise Oscillator B’s octave to +4 for modulation using FM synthesis.
Key effects include Hyper Dimension, Phaser, Distortion (Downsample), and Multiband Compressor. These are applied to add depth, grit, and compression to the sound, while tweaking the mix and modulation settings enhances the robotic, digital texture.
The tutorial suggests using Camel Crusher for distortion and Clip Shifter for extra raw grit. These free plugins, along with Multiband Dynamics and EQ Eight, are used to further refine the dubstep bass sound, adding warmth and fine-tuning the mix.
For the first LFO, set the curve to a custom shape, switch the mode to Trigger, and lower the rate to 1/2. The second LFO should have a narrower curve, also set to Trigger, with a faster rate of 1/8. Both LFOs modulate key parameters for dynamic sound shaping.