

Given today’s technology such as the ability to quantize everything on time, anyone can build a beat in Logic Pro with minimum effort. Despite the ease of it, there are times when even the most experienced beat-makers pull their hair out trying to understand how their favorite producers wrote a groove.
In many ways, drum machines were made to imitate real drummers and the failure of doing so in the earlier models, birthed a whole new genre of monotonous electronic beats – think Kraftwerk and Giorgio Moroder. As amazing as that music was, contemporary production often requires more varied dynamic rhythms.
In my experience, the magic formula lies in a number of different factors: dynamics, variation, sound design, and groove. Because groove is an innate thing, which takes a lot of personal learning, and sound design is a longer discussion, we’ll be focusing on variation and dynamics in this tutorial.
Fight the power! (of Quantization)
Even if you’re composing really tight electro, nothing sounds duller than all the elements of a track having been quantized. Using a drum machine like Native Instruments Machine or Ableton Push is easiest way of building a dynamic groove by utilizing their pressure sensitive pads.
If you’ve got an innate sense of rhythm, you can build a beat without quantizing anything. J Dilla, who’s arguably the most acclaimed beat maker of all time, played all his beats by hand, bar after bar with no quantization – adding to his natural style of groove. He also used an MPC 60 & 3000; machines that many aficionados claim have timing issues that make certain hits come in a little late – adding to the swing of the groove.
So how do we emulate the same rhythmic variations in a digital domain where quantization is perfect?
For this tutorial we’ll be sequencing in Logic Pro X but these tricks can be used in any DAW or sequencer like NI Maschine, where I frequently utilize them. However, this is a great tutorial for laptop warriors out there without a drum machine.
The reasons why real drums sound dynamic and alive are the small variations in tone, velocity and timing on the hits. What we’re going to do is emulate these variations using the basic tools provided in Logic Pro.
Step 1
The first thing we are going to do is create a basic drum loop with a hi hat, kick, snare and clap on their own tracks. Then we’re going to make an extra hi hat track called ‘Hi hat alt’ and an extra snare track called ‘Snare alt’. Copy every second hit of the hi hat to the second track and the same with the snare, so that they alternate back and forth between the two.
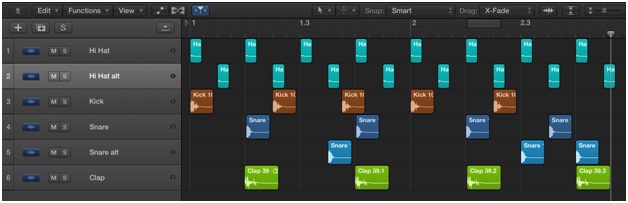
We are now going to create our first variations of the snare and hi hat, which are going to be done by altering the tone and velocity. Insert Logic’s Pitch Shifter plugin onto the ‘Hi hat alt’ channel by going to the channel strip and selecting it like so:
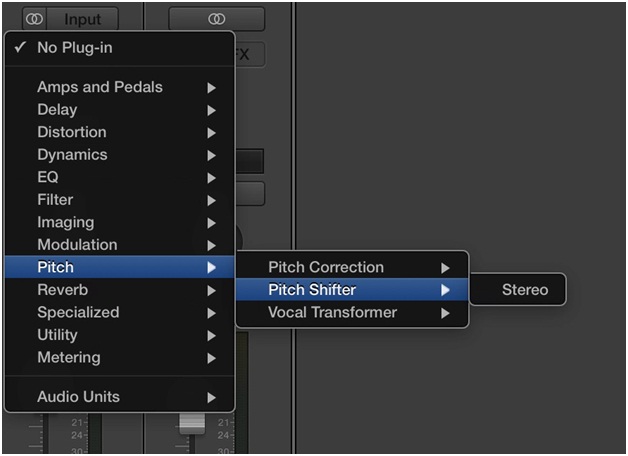
In the Pitch Shifter plugin, change the setting to drums and shift the pitch down to -2 semitones. Then set the mix level to 35%. You can play around with the settings but anything too extreme will start to sound weird. We want the hi hat to sound like a different hit of the same one. Now do the same on the ‘Snare alt’ track with the same settings.

Doing this changes the tone slightly of every second hit. The next thing to do is to drop the volume of the alternate hi hat down to -2.5 dB lower than the volume of main hi hat. This will lower the perceived velocity of the alternative hat the way a drummer would play it in real life. Drop the volume on the snare as well but only go down to -2db as snares are usually less dynamic, especially after compression in mixes.
What we now want to do is to change the transient of the alternate snare tracks. We’re going to do this by simply drawing in a teeny fade onto each hit. Press the escape key and choose the fade tool (press ‘A’ or click it with the mouse). Then draw in the fade on the alternative snares. Don’t make the fades too long or you’ll kill the initial attack of the snare. You can use the same method on the hi hats if you want to.
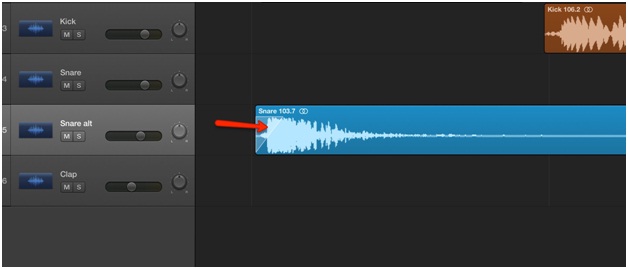
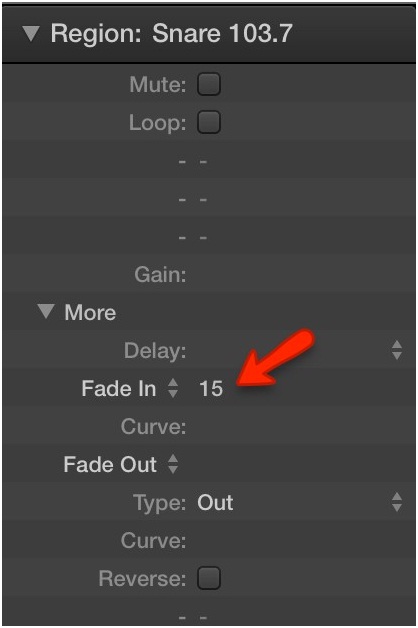
Note: if you’re pressed for time, you also do this quickly by highlighting all the alt snares, go to the top right corner above the channel strip, click region, click more and then choose ‘fade in’ and set it to around 15. This is a great time saver, however all the alt hits with have the same fade, which means slightly less variation.
Playing back your sequence now, you can hear what a huge difference it’s made to the dynamics of the track – especially on the hi hats, which alone is worth the effort.
I tend to leave the kicks alone in this part as most kicks are compressed and consistent in electronic music, however it might be worth playing with if you want even more dynamics.
Cymbals are the biggest giveaway in over-quantized electronic music and making them sound organic is the best way of breathing life into your drums. Using this method, you can get really deep by creating even more variations of the hi hat with, say, four different velocities and an open hat sample to create a beautifully dynamic and natural sounding loop which you can then bounce to a single audio file and reimport into your project.
Step 2
The next step in the process is creating a unique timing for every single hit in the pattern, including the kicks. Assuming you’ve dragged the drum samples into the DAW like I did when creating the pattern, Logic has probably snapped each sample perfectly into time on the grid.
When listening to great drummers, you’ll notice that sometimes they’ll ride the pocket and go out of time for a few beats but they always come back on the one. We’re going to do the same with our loop but less extreme (this isn’t jazz!). What we’re going to do is nudge every sample around the beat except the main hi hat, which is keeping time in this case.
Make sure you are in the ‘Smart’ snap mode.
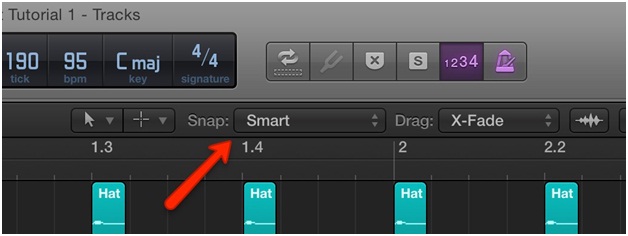
Highlight individual snares, alt snares, kicks, alt hats and claps and nudge them slightly before or after the beat by holding down the alt or option key and pressing the left or right arrows. Logic will move the hits in tiny increments. Here you can see how my main hi hat is in time and the other hits are varied.
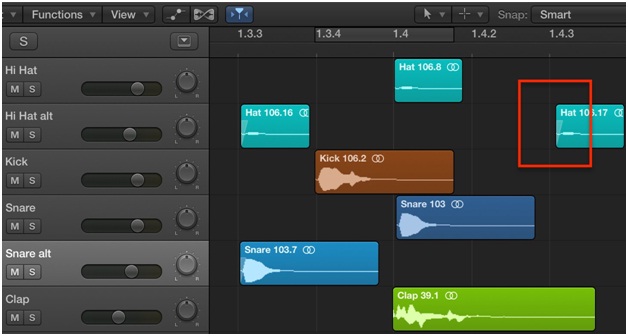
Don’t get too carried away as you don’t want your beat to sound out of time (or maybe you do?). The smallest nudges make a world of difference. Most of the time a hit coming in slightly late sounds a better than one too early and gives the beat a slight swing. This is also one of the big factors contributing to the famous hip hop ‘bounce’ that partially originated from the timing issues of the early MPCs, along with introduction of a ‘swing’ dial on the hardware.
And last but not least, is the layering of samples that change in relation to one another. We all like to layer sounds, especially snares and kicks. I like to layer claps on top of snares. But instead of having the clap and snare come in at the exact same time every hit, I like to move my clap around in relation to the snare, as if it were recorded by a real group of people like the Motown artists often did.
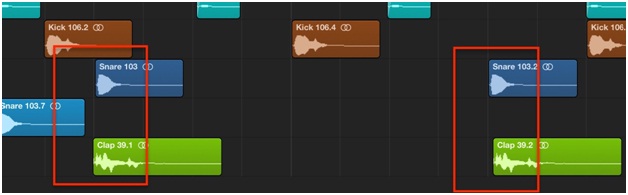
I keep my snare tight and more in time and nudge the clap to come in slightly before or after the snare on each hit. This will give a greater variety of sound than just moving the snare. On the image below, you can see just how early my clap comes in. In the next bar it comes in quite a bit later.
I wouldn’t advise doing this on kicks as they usually only have one transient hit and you could run into phase problems and loose the impact and bass. If you layer kicks, they should be locked into place with one another.
At the end of the day, there are no rules, but if you study the beats you love and understand why they work, you can use some of these techniques to make your grooves sound as natural and seamless as they do without a drum machine.
Happy beat making!
About the Author:
GoodBrain is a London based music producer, songwriter and engineer.
Links:
FB – https://www.facebook.com/goodbrainmusic/
TW – https://twitter.com/GoodBrainMusic
To show this content you have to accept our cookies.